
GPUs and Kubernetes for deep learning — Part 3/3: Automating Tensorflow

Samuel Cozannet
on 9 March 2017
Tags: containers , deep learning , kubernetes , TensorFlow
Here we are. After having spent 21min reading how to build a GPU Kubernetes cluster on AWS, 7min on adding EFS storage, you want to get to the real thing, which is actually DO something with it. So today we are going to define, design, deploy and operate a Deep Learning pipeline.
So what is a Deep Learning pipeline exactly? Well, my definition is a 4 step pipeline, with a potential retro-action loop, that consists of:
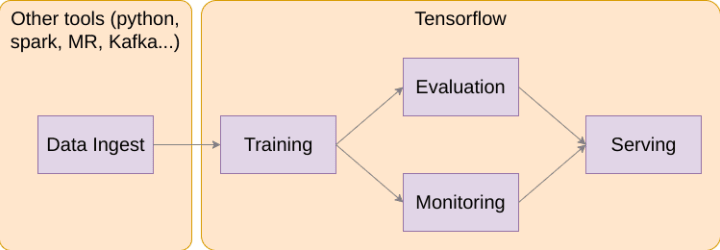
Deep Learning pipeline
- Data Ingest: This step is the accumulation and pre processing of the data that will be used to train our model(s). This step is maybe the less fun, but it is one of the most important. Your model will be as good as the data you train it on
- Training: this is the part where you play God and create the Intelligence. From your data, you will create a model that you hope will be representative of the reality and capable of describing it (and even why not generate it)
- Evaluation + Monitoring: Unless you can prove your model is good, it is worth just about nothing. The evaluation phase aims at measuring the distance between your model and reality. This can then be fed back to a human being to adjust parameters. In advanced setups, this can essentially be your test in CI/CD of the model, and help auto tune the model even without human intervention
- Serving: there is a good chance you will want to update your model from time to time. If you want to recognize threats on the network for example, it is clear that you will have to learn new malware signatures and patterns of behavior, or you can close your business immediately. Serving is this phase where you expose the model for consumption, and make sure your customers always enjoy the latest model.
Now, what is a good way of modelling an application in Kubernetes?
A good model must be easy to reproduce, which boils down to how good your packaging is.
You would not be using Ubuntu if there wasn’t a predictable apt utility to install all the things.
Canonical would not spend considerable money and efforts on Ubuntu Core and its Snap Application Containers if it did not believe there was ultimately a benefit to the community on agreeing on a multi-distribution packaging format.
Docker would be a lot less successful as it is if it did not solve a fundamental problem of sharing common ground from devs to ops.
Packaging at scale is a much harder problem than single OS packaging. Canonical solves the packaging of large scale “pet” application with Juju and charms. And Kubernetes solves the problem of large scale “cattle” applications with Helm. Let’s do this for Deep Learning!
The Deep Learning framework we will use is Tensorflow, Google’s own open source DL solution. As Google also open sourced Kubernetes, it seems only natural to combine these 2 pieces together.
The plan
What are we going to do?
We will reuse the bits and pieces of previous posts to focus on the Deep Learning so
- Deploy Kubernetes with GPUs: Check! see Part 1
- Add EFS storage to the cluster: Check! See Part 2
- Data ingest code & package
- Training code & package
- Evaluation code & package
- Serving code & package
- Deployment process
- Conclusion
So yes, it will be a long process! I hope you have some time. In the end, what we model will look like:
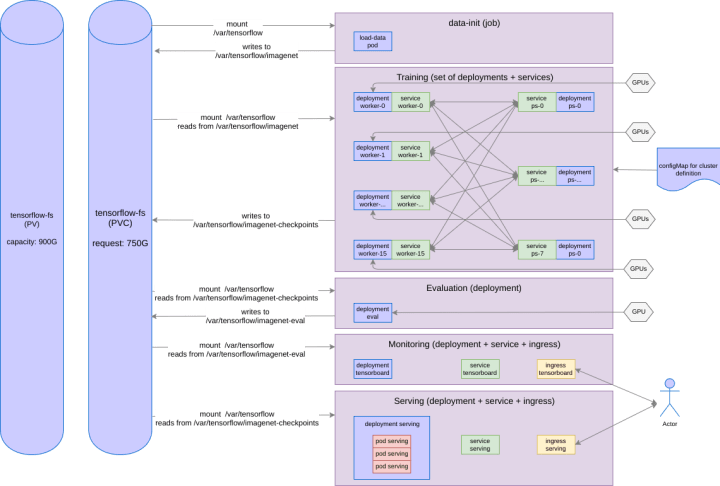
Kubernetes Helm Chart
Requirements
For what follows, it is important that:
- You understand Kubernetes 101
- You understand the basics of Deep Learning and specifically Tensorflow
- You understand or want to understand the basics of Kubernetes packaging with Helm
- It may sound kinder garden, but you’ll also need a bit of Dockerfile writing knowledge
Foreplay
- It is assumed that you have succesfully deployed reproduced the 2 previous parts. If not or if you have troubles in any step, reach out!
- Make sure you have Helm installed. At the time of this writing, we are on 2.2.1
curl https://raw.githubusercontent.com/kubernetes/helm/master/scripts/get > get_helm.sh
chmod 700 get_helm.sh
./get_helm.sh
helm init- More advanced instructions are available in the official docs
Copy this repo to have access to all the sources
git clone https://github.com/madeden/blogposts ./
cd blogposts/k8s-dl- You will need to serve the Helm Charts, which you can do by:
cd src/charts
helm serve . &
Ingest Pipeline
Introduction
Any good data story starts with raw data, carefully pre-processed and published to a known location.
ImageNet is a massive dataset of images that is used, among other things, to train the Inception model. It is made of a series of files that are managed by imagenet.org, which are not natively compliant with Tensorflow.
Google open sourced the code to download and pre process ImageNet a little while ago here. To automate the download, we creates a simple Docker image src/docker/tf-models/Dockerfile that re-uses the tensorflow official image to pull the dataset to ${DATA_DIR}/imagenet.
This is where the EFS volume you added earlier will come handy, as this will take about 500GB in the end. By the way, on my AWS instances it took about 3 days to download and pre-process it, so be prepared and patient.
Packaging Storage
To deploy this, you need
- Persistent Volume (see previous blog), oversized to 900GB to also accomodate the models.
- Persistent Volume Claim (see previous blog), oversized to 750GB
- Kubernetes construct called a Job, which is essentially a way to run batch or cron jobs in k8s, where we mount our PVC, and that uses the image described above.
The process of building a helm chart is pretty simple: you abstract all the configuration, put all the values in a yaml file and all the keys in a set of other yaml templates forming the skeleton of Kubernetes manifests. You add some metadata around it, and voilaaa. See the src/charts folder to get a feel of what it is.
Note: If you had to create a chart, you could do `helm create foobar` and it would generate the skeleton for you
The first chart we create is the EFS chart, which will connect our EFS storage to Kubernetes. We create a storage.yaml file in src/charts/efs/templates with:
# Creating the PV first
apiVersion: v1
kind: PersistentVolume
metadata:
  name: {{ .Values.storage.name }}
  namespace: {{.Release.Namespace}}
  labels:
    heritage: {{.Release.Service | quote }}
    chart: "{{.Chart.Name}}-{{.Chart.Version}}"
    release: {{.Release.Name | quote }}
  annotations:
    "helm.sh/created": {{.Release.Time.Seconds | quote }}
spec:
  capacity:
    storage: {{ .Values.storage.pv.capacity }}
  accessModes:
  - {{ .Values.storage.accessMode }}
  nfs:
    server: {{.Values.global.services.aws.efs.id}}.efs.{{.Values.global.services.aws.region}}.amazonaws.com
    path: "/"
---
kind: PersistentVolumeClaim
apiVersion: v1
metadata:
  name: {{ .Values.storage.name }}
  namespace: {{.Release.Namespace}}
  labels:
    heritage: {{.Release.Service | quote }}
    chart: "{{.Chart.Name}}-{{.Chart.Version}}"
    release: {{.Release.Name | quote }}
  annotations:
    "helm.sh/created": {{.Release.Time.Seconds | quote }}
spec:
  accessModes:
  - {{ .Values.storage.accessMode }}
  resources:
    requests:
      storage: {{ .Values.storage.pvc.request }}
Yes, you recognized Go templates!! Now look at the values.yaml file:
global:
  imagePullPolicy: IfNotPresent
  services:
    aws:
      region: us-east-1
      efs:
        id: fs-47cd610e
storage:
  name: tensorflow-fs
  accessMode: ReadWriteMany
  pv:
    capacity: "900Gi"
  pvc:
    request: "750Gi"
Pretty easy: you replace the sub sections by dots, apply a camelCase convention on your variables, and you have your first introduction to Helm. If you then use helm preview the output with
helm install efs --name release-name --namespace super-ns --debug --dry-runyou will generate a Kubernetes manifest like:
# Creating the PV first
apiVersion: v1
kind: PersistentVolume
metadata:
  name: tensorflow-fs
  namespace: super-ns
  labels:
    heritage: Tiller
    chart: tensorflow
    release: release-name
  annotations:
    "helm.sh/created": 12345678
    "helm.sh/hook": pre-install
    "helm.sh/resource-policy": keep
spec:
  capacity:
    storage: 900Gi
  accessModes:
  - ReadWriteMany
  nfs:
    server: fs-47cd610e.efs.us-east-1.amazonaws.com
    path: "/"
---
kind: PersistentVolumeClaim
apiVersion: v1
metadata:
  name: tensorflow-fs
  namespace: super-ns
  annotations:
    "helm.sh/created": 12345678
    "helm.sh/hook": pre-install
    "helm.sh/resource-policy": keep
  labels:
    heritage: Tiller
    chart: tensorflow
    release: release-name
spec:
  accessModes:
  - ReadWriteMany
  resources:
    requests:
      storage: 750Gi
Simple!! If you remove the dry-run you’d actually deploy it, but we don’t want to do that now.
You can also override the default values.yaml file by adding
--values /path/to/my-values.yamlYou can already start building your own by copying mine and changing the values to adapt to your own environment.
You get the drill. We prepare templates, we have a value file to instanciate it. Helm mixes both and generates a YAML file that works with Kubernetes. When you helm install, a small server called Tiller in the Kubernetes cluster relays the instantiated manifest to the API for deployment (this Tiller server was created when running helm init. You can create anything Kubernetes can operate. More info on the structure and some tips to start developing in the docs.
Packaging Data Ingest
We create a Helm chart called dataloader, which
- has a requirement on efs, expressed via a requirements.yaml file at the root of the chart
- Adds a job which will download “something” that you can configure.
Review the content of src/charts/dataloader to understand the structure.
Now you can use the Makefile in the charts folder to build this package,
cd src/charts
make dataloader
Then you can deploy that on your cluster, and start the download
helm install dataloader --name dataloader --values /path/to/my-values.yamlHow to adapt for yourself?
The key of customizing this is your ability to prepare a docker image that makes sense in your context.
Look in the repo in the folder src/docker/tf-models for a file called download.sh, and modify it to your needs.
Build it with
./src/docker/tf-models
docker build --rm \
  -t /: \
  -f Dockerfile-1.0.0 \
  .
Note that you can use if needed the version 0.11, which I made because of some compatibility problems due to the breaking transition between 0.11 and 0.12 that are still not fixed in 1.0.0 for distributed training.
Then push that to your repo
docker push /: Create the EFS and everything that is needed in AWS by following the previous part instructions.
Now start a file my-values.yaml that contains the global, storage and dataLoader sections:
global:
  imagePullPolicy: IfNotPresent
  services:
    aws:
      region: us-east-1
      efs:
        id:
storage:
  name: tensorflow-fs
  accessMode: ReadWriteMany
  pv:
    capacity: "900Gi"
  pvc:
    request: "750Gi"
dataLoader:
  service:
    name: dataloader
    command: '[ "/download.sh" ]'
  settings:
    dataset: flowers
    imagenetUsername: foo
    imagenetApiKey: bar
  image:
    repo:
    name:
    dockerTag:
And publish this to the cluster with:
helm install dataloader --name dataloader --namespace default --values /path/to/my-values.yaml --debugIf you had it deployed before, you can do:
helm upgrade dataloader dataloader --values /path/to/my-values.yamlThat’s it. You now have a dataset being downloaded. You can go and take 42 coffees while it does so, or continue reading this blog to understand your next steps.
For now let us focus on bringing all our services up and running.
Training
Architecture
Training is often the most advertised feature of Deep Learning. It is where the science and the actual magic happens. In about all cases, the performance can be drastically increased if you leverage GPUs, which, by chance, we learnt how to add in a Kubernetes cluster.
When running locally on your workstation, you do not really care about the scheduling of the code. Tensorflow will try to consume all the resources available. If you have several GPUs, you can ask it to use them all or only some of them.
However, when you start scaling out your system, things get a bit more intricated. Tensorflow uses 2 types of jobs to distribute compute: Parameter Servers and Workers
- Parameter Servers store and update variables for other nodes. They essentially handle “configuration” traffic.
- Workers do the hard part and provide compute to complete the tasks they are given. One of the worker is given a specific Master role, and is in charge of coordination between all workers. It seems that this always defaults to worker-0 in what I have seen so far.
Both PS and workers will attempt to use GPUs if they are available, and compete around that. Because PSes have a lesser usage of the GPU and it is usually a scare resource, it makes sense to be careful when allocating resources to the different entities of Tensorflow. On the metal of your machine, this can be a problem. But containers and resource management will help us deal with this elegantly.
A second thing to take into account is a limitation of packaging (and probably my own limitations). When building the package, it is about impossible to know on which worker each job will run, and to predict the number of GPUs that will be available to Tensorflow, especially on asymetric clusters where some nodes have 1x GPU, others have 2, 8 or more. Because Kubernetes is not very clever at this stage in exposing GPUs like it exposes other resources like CPU or RAM, the only way I have been able to make the packaging work is to assume all nodes equal.
If you followed last blog and remember the fact we deployed one p2.xlarge and one p2.8xlarge well… Unfortunately we will be limited by the p2.xlarge and only leverage 1 GPU in each server.
Last but not least, Tensorflow does not seem to have the ability to change its scale dynamically (without restarting the cluster). This actually makes our lives easier when it comes to planning deployment.
Let us look into the structures we need to design our cluster:
- Distinguishing between PS and Worker will require a conditional structure
- Managing variable size will require to iterate on a sequence, like a for loop. In Helm, this uses a notion called range
Implementation — Deployment for Tensorflow jobs
Let us look into src/charts/tensorflow/values.yaml and src/charts/tensorflow/templates/cluster-deployment.yaml to analyze the different sections:
# Values File, section for the Tensorflow cluster
tfCluster:
  service:
    name: tensorflow-cluster
    internalPort: 8080
    externalPort: 8080
    type: ClusterIP
  image:
    repo: samnco
    name: tf-models
    dockerTag: train-1.0.0-gpu
  settings:
    isGpu: true
    nbGpuPerNode: 1
    jobs:
      ps: 8
      worker: 16
So here in the values tell us how big our cluster will be (8 PS, 16 Workers, 2 GPUs per node).
In the deployment template, we start by defining the Configuration File via a configMap:
# Defining a generic configuration file for the cluster
apiVersion: v1
kind: ConfigMap
metadata:
  name: tensorflow-cluster-config
  namespace: {{.Release.Namespace}}
data:
  clusterconfig: >
        {
        {{- range $job, $nb := .Values.tfCluster.settings.jobs }}
          {{ $job | quote }}: [
          {{ range $i, $e := until (int $nb) | default 8 }}
            "{{ $job }}-{{$i}}.{{ $relname }}.svc.cluster.local:8080",
          {{ end }}
              ],
        {{- end }}
        }
You can see the {{ range }} section, where we iterate over the jobs section. When instanciated, this will create something like:
{
  "ps": [
    "ps-0.default.svc.cluster.local:8080",
    "ps-1.default.svc.cluster.local:8080",
    ...
    "ps-7.default.svc.cluster.local:8080",
  ],
  "worker": [
    "worker-0.default.svc.cluster.local:8080",
    ...
    "worker-15.default.svc.cluster.local:8080",
  ],
}
You recognize here that the JSON we form is not clean, we have a last comma that Tensorflow will accept, but that you need to be careful about.
Also note in the range structure that we iterate with an index starting at 0 on a number of values, hence we go from 0 to 7 for 8 PS jobs.
Now if we go a little lower in the file, we can see the conditional section:
{{ if eq $job "worker" }}
        {{ if $isGpu }}
        securityContext:
          privileged: true
        resources:
          requests:
            alpha.kubernetes.io/nvidia-gpu: {{ $nbGpu }}
          limits:
            alpha.kubernetes.io/nvidia-gpu: {{ $nbGpu }}
        volumeMounts:
          {{ range $j, $f := until (int $nbGpu) | default 1 }}
        - mountPath: /dev/nvidia{{ $j }}
          name: nvidia{{ $j }}
          {{ end }}
        {{ end }}
        {{ end }}
if we are building a GPU cluster, we only allocate GPUs to Worker processes, and we allocate to each worker all the GPUs it can access on a given node. We do not forget to share the necessary char devices as well (/dev/nvidia0 and further)
Our training image is taken from the Inception tutorial Google provides, which we operate via a simple bash program that reads the configMap, extracts the proper JSON, and launches the training process from that:
bazel-bin/inception/${DATASET}_distributed_train \
  --batch_size=32 \
  --data_dir=${DATA_DIR}/${DATASET} \
  --train_dir=${DATA_DIR}/${DATASET}-checkpoints \
  --job_name="${JOB_NAME}" \
  --task_id=${TASK_ID} \
  --ps_hosts="${PS_HOSTS}" \
  --worker_hosts="${WORKER_HOSTS}" \
  --subset="train"
You will notice that we enforce the data_dir to the output of our ingest phase, to ensure that our training will really read from there. The Dockerfile provides ideas to improve this section that are out of the scope of this article but you are welcome to contribute 😉
Implementation — Deployment for Tensorflow Job Services
In order to make each of these jobs reachable via Service Discovery, each of them is mapped to its own Kubernetes Service, which is available in the cluster-service.yaml file.
Implementation — Configuration
The section of the values.yaml file is
tfCluster:
  deploy: true
  service:
    name: tensorflow-cluster
    internalPort: 8080
    externalPort: 8080
    type: ClusterIP
  image:
    repo: samnco
    name: tf-models
    dockerTagCpu: train-0.11-0.0.8
    dockerTagGpu: train-0.11-gpu-0.0.8
  settings:
    dataset: imagenet
    isGpu: true
    nbGpuPerNode: 1
    jobs:
      ps: 8
      worker: 16
You can see in the settings section how we are adding a pre-computed number of GPUs per node, and creating our PS and Worker jobs.
How to adapt for yourself?
Again, this is pretty straighforward. You are expected to prepare any Docker image for Tensorflow which will receive
- its cluster configuration from an ENV named CLUSTER_CONFIG, in the format of the JSON described above
- its job name as an ENV named POD_NAME in the format
–
These are the only requirements really. You can prepare CPU and GPU images, publish them, and adapt the tfCluster section of your values.yaml file to match your configuration.
Why don’t we deploy now?
Because first we need to review the evaluation and serving processes!! We’re not even half way!
Evaluation & Monitoring
Architecture
Evaluation is a specific process, that consumes GPU, amd which output allows measuring the quality of the model. It outputs data that can be consumed by Tensorflow’s GUI, the Tensorboard. Without the tensorboard, it is very hard for a human being to understand how the training evolves and if the parameters are OK.
The tensorboard itself is a simple process that exposes a web application to present the graphs & data. Therefore we need to plan a service and am ingress point for it, in order to let the world see it.
Implementation
In order to keep this blog as short as possible, I’ll leave it to you to review the content of src/charts/tensorflow/eval-deployment.yaml and src/charts/tensorflow/tensorboard-service.yaml, which follow the same ideas as the previous ones.
The values.yaml section looks like:
evaluating:
  deploy: true
  replicaCount: 1
  image:
    repo: samnco
    name: tf-models
    dockerTagCpu: train-0.11-0.0.8
    dockerTagGpu: train-0.11-gpu-0.0.8
  service:
    name: eval
    command: '[ "/eval.sh" ]'
  settings:
    dataset: imagenet
    isGpu: true
    nbGpuPerNode: 1
  resources:
    requests:
      cpu: 1000m
      memory: 1Gi
    limits:
      cpu: 2000m
      memory: 4Gi
tensorboard:
  deploy: true
  replicaCount: 1
  image:
    repo: gcr.io/tensorflow
    name: tensorflow
    dockerTag: 1.0.0
  service:
    name: tensorboard
    dns: tensorboard.madeden.net
    type: ClusterIP
    externalPort: 6006
    internalPort: 6006
    command: '[ "tensorboard", "--logdir", "/var/tensorflow/imagenet-eval" ]'
  settings:
  resources:
    requests:
      cpu: 2000m
      memory: 4Gi
    limits:
      cpu: 4000m
      memory: 8Gi
You’ll note
- The amount of compute given to Tensorboard is high. Even this may be too small, I found this system very resource consuming. It often crashes or becomes unresponsive if the model is kept training for a long time.
- The fact we include the GPU as an option, like we did in the cluster context.
- The DNS Record for the tensorboard (here tensorboard.madeden.net): You will need to prepare a DNS round robin that points to the public addresses of your worker nodes in order to access this. My recommendation is to have a generic record like workers.yourdomain.com then a CNAME to this for the tensorboard.
How to adapt for yourself?
You’ll need to prepare an eval.sh script and/or a specific Docker image that will handle the evaluation of the model. It shall have the following properties:
- Read files from a predictable location
- Write evaluation from a predictable location
In our context we start the evaluation with:
bazel-bin/inception/${DATASET}_eval \
 --checkpoint_dir="${DATA_DIR}/${DATASET}-checkpoints" \
 --eval_dir="${DATA_DIR}/${DATASET}-eval" \
    --data_dir="${DATA_DIR}/${DATASET}" \
 --subset="validation"
which means we expect the training to write in ${DATA_DIR}/${DATASET}-checkpoints, the evaluation to write from ${DATA_DIR}/${DATASET}-eval and the evaluation dataset to lie in ${DATA_DIR}/${DATASET}
You will also need to adjust the Tensorboard command to adjust the location of the logs.
Why don’t we deploy now?
You are sooooo impatient. We just need to review the serving process and we’re done.
Serving
Architecture
Serving is the ability to present the trained model for consumption by third party users. This process, which can be done via tensorflow-serving, consumes the output of the training process, which we store in imagenet-checkpoints, and offers to query it via an API.
Anyone can then submit an image, and get an JSON file as an answer, which contains the things that have been identified and the probability that model is right about them.
Serving a model does not require a lot of processing power and can run on a reasonable CPU only instance. However it must be able to scale quite a lot horizontally, especially if the model is served to numerous clients. Therefore, we are going to take a deployment approach, and serve the model via a service and an ingress point.
On the docker side, this is also a bit complicated. Tensorflow serving is very new, and less mature than the rest of the TF ecosystem. The official docker image provided by Google is very intricated, and rebuilds Bazel at image build, which is suboptimal. I made a secondary image that builds from the official tensorflow image, add the bazel binaries, then installs the serving part. A little faster to build, especially after building all the other images from the repo.
Because the model evolves over time, we have to add a few parameters to the launch command, which perspire via the ENV we set:
/serving/bazel-bin/tensorflow_serving/model_servers/tensorflow_model_server \
    --port=${PORT}\
    ${BATCHING} \
    --model_name=${MODEL_NAME} \
    --model_base_path=${MODEL_PATH}
the enable_batching setting is the key here, and will have TF Serving to reload the model on a cron bases, by default every 5min. As we also keep the default at training, which is to export a new checkpoint every 10min, this makes sure that the latest model is always served.
Implementation
The implementation is done via the files src/charts/tensorflow/serving-deployment.yaml and src/charts/tensorflow/serving-service.yaml, which I’ll leave to you to review. You can also review the serving part of values.yaml to understand the configuration.
the values.yaml file deserves a review:
serving:
  deploy: true
  replicaCount: 3
  image:
    repo: samnco
    name: tf-models
    dockerTag: serving-1.0.2
  service:
    name: serving
    dns: inception.madeden.net
    type: ClusterIP
    externalPort: 8500
    internalPort: 8500
    command: '[ "/serve.sh" ]'
  settings:
    dataset: imagenet
  resources:
    requests:
      cpu: 50m
      memory: 256Mi
    limits:
      cpu: 200m
      memory: 512Mi
here again we have a DNS record to manage, which you’ll be expected to add as a CNAME if following the previous advice, or a round robin to all workers otherwise.
How to adapt for yourself?
You’ll need to prepare a serve.sh script and a specific image that will handle serving of the model, which you can base on the Dockerfile-1.0.0-serving provided. It shall have the following properties:
- Read files from a predictable location
- Have a predictable model name
In our context we start the evaluation with:
/serving/bazel-bin/tensorflow_serving/model_servers/tensorflow_model_server \
    --port=${PORT}\
    ${BATCHING} \
    --model_name=${MODEL_NAME} \
    --model_base_path=${MODEL_PATH}
Which give you an indication of what to modify in your context.
And yes… Now we deploy!
Deploying!!
Deploying Tensorflow
At last!!
Let’s assume you have
- prepared your my-values.yaml file
- Added tensorboard.yourdomain.com and serving.yourdomain.com DNS records pointing to the workers
- Have deployed the dataloader
Then you can just do:
make tensorflow
helm install tensorflow --name tensorflow --values /path/to/my-values.yaml --debug
and watch your cluster start. After a few minutes, you can go to your tensorboard and you should see
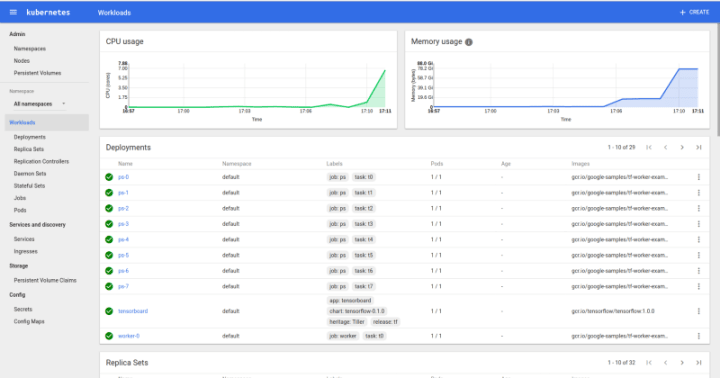
Kubernetes UI with Tensorflow deployed
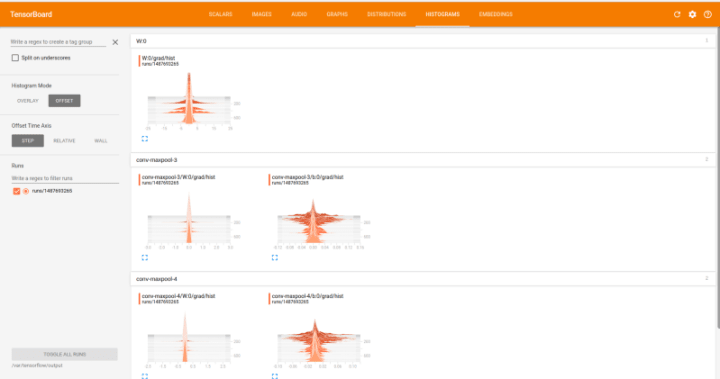
Tensorboard for Distributed CNN in k8s
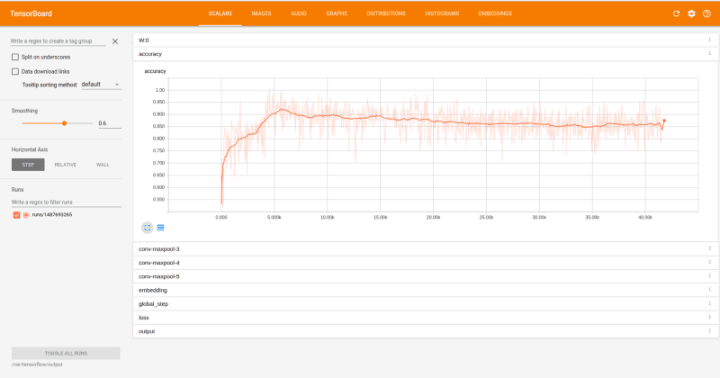
Tensorboard UI
A few words before concluding
To prepare this blog I worked on 2 models: Imagenet and a Distributed CNN from a workshop Google made last August. The Distributed CNN is nice because it uses a small dataset, therefore works very nicely and quickly OOTB.
Imagenet is the one I would really have loved to see working, and all the images are meant to leverage it. Unfortunately at this stage, everything starts nicely, but it doesn’t seem to actually train. PS and workers start, then do nothing without failing, and do not output any logs. I’m working on it, but I didn’t want to have you wait too long for the post…
Contact me in PMs to discuss and if you’d like to experiment with it or share ideas to fix this, I will gladly mention your help 🙂
In addition, if you use the 1.0.0 Tensorflow images for Imagenet, you will encounter an issue due to the transition from 0.11 to 0.12, which essentially returns something like:
$ kubectl logs worker-0-2134621739-2qd0j
Extracting Bazel installation...
.........
____Loading package: inception
...
____Found 1 target...
____Building...
____[0 / 1] BazelWorkspaceStatusAction stable-status.txt
____Building complete.
...
I tensorflow/stream_executor/dso_loader.cc:135] successfully opened CUDA library libcurand.so.8.0 locally
INFO:tensorflow:PS hosts are: ['ps-0.default.svc.cluster.local:8080']
INFO:tensorflow:Worker hosts are: ['worker-0.default.svc.cluster.local:8080', 'worker-1.default.svc.cluster.local:8080']
...
I tensorflow/core/common_runtime/gpu/gpu_device.cc:885] Found device 0 with properties:
name: Tesla K80
major: 3 minor: 7 memoryClockRate (GHz) 0.8235
pciBusID 0000:00:1e.0
Total memory: 11.17GiB
Free memory: 11.11GiB
I tensorflow/core/common_runtime/gpu/gpu_device.cc:906] DMA: 0
I tensorflow/core/common_runtime/gpu/gpu_device.cc:916] 0:   Y
I tensorflow/core/common_runtime/gpu/gpu_device.cc:975] Creating TensorFlow device (/gpu:0) -> (device: 0, name: Tesla K80, pci bus id: 0000:00:1e.0)
I tensorflow/core/distributed_runtime/rpc/grpc_channel.cc:200] Initialize GrpcChannelCache for job ps -> {0 -> ps-0.default.svc.cluster.local:8080}
I tensorflow/core/distributed_runtime/rpc/grpc_channel.cc:200] Initialize GrpcChannelCache for job worker -> {0 -> localhost:8080, 1 -> worker-1.default.svc.cluster.local:8080}
I tensorflow/core/distributed_runtime/rpc/grpc_server_lib.cc:221] Started server with target: grpc://localhost:8080
Traceback (most recent call last):
  File "/models/inception/bazel-bin/inception/imagenet_distributed_train.runfiles/inception/inception/imagenet_distributed_train.py", line 65, in
    tf.app.run()
...
TypeError: __init__() got multiple values for keyword argument 'dtype'
If you have this issue, use a 0.11 or anterior image. Please Tensorflow Gods, fix this!
Conclusion
Another looong blog post. But I think it was worth it. Essentially, you have:
- Deployed Kubernetes 1.5.X using the Canonical Distribution of Kubernetes (CDK)
- Activated GPU workloads in it
- Added storage
- Modeled Tensorflow in a scalable and easy to operate Helm Chart
- Deployed that Helm chart
- Learnt how to reproduce this for yourself
At this stage, you should be able to use Kubernetes and Tensorflow for your own science. I truly hope so, and if not, just ping me and we’ll sort you out.
Big, Huge thanks to Amy who published the initial workshop that inspired this Helm chart, and to the other folks at Google, open sourcing so much content. This is awesome, and I hope this will help others to adopt the tech.
Next Steps
This Tensorflow Helm chart is far from perfect, but it’s better than nothing. I intend to kindly ask to add it to the kubeapps and iterate from there.
This idea of building blocks around k8s is really powerful, so I will now be working on building more stacks. First next target is DeepLearning4j with my friends from Skymind!
You have a question, a request, a bug report, or you want to operate a GPU cluster? tweet me @SaMnCo_23 and let’s talk.

What is Kubernetes?
Kubernetes, or K8s for short, is an open source platform pioneered by Google, which started as a simple container orchestration tool but has grown into a platform for deploying, monitoring and managing apps and services across clouds.
Newsletter signup
Related posts
How to use Ubuntu in GKE on nodes and in containers
Google Kubernetes Engine (GKE) traces its roots back to Google’s development of Borg in 2004, a Google internal system managing clusters and applications. In...
Canonical Delivers Secure, Compliant Cloud Solutions for Google Distributed Cloud
Today, Canonical is thrilled to announce our expanded collaboration with Google Cloud to provide Ubuntu images for Google Distributed Cloud. This partnership...
Implementing an Android™ based cloud game streaming service with Anbox Cloud
Since the outset, Anbox Cloud was developed with a variety of use cases for running Android at scale. Cloud gaming, more specifically for casual games as...